
Your Cart is empty


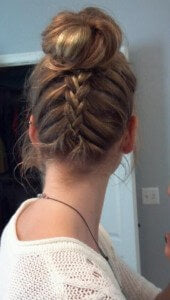
If you are sick to death of the standard dutch braid and side swept holiday hair then this look is the one for you. It has our favourite elements of braids and a bun to make this look an absolute killer. If you want to make it cute or a little more edgy this style can be moulded to suit your personality. Read this step by step guide to get this gorgeous style.
Prep
To prepare for this style you need to have second day hair that is neatly brushed. Second day hair is often not as sleek and therefore flat as newly washed hair, perfect for making that statement braid.
Do it dutch
For maximum statement a dutch braid is the way to go. Flip your hair forward and divide a section of hair at the nape of your neck into 3. Start dutch braiding upwards, including a few extra strands as you go along. Once you are at the crown of your head secure the ends into a ponytail. Gently tug on your braid to make it fuller.
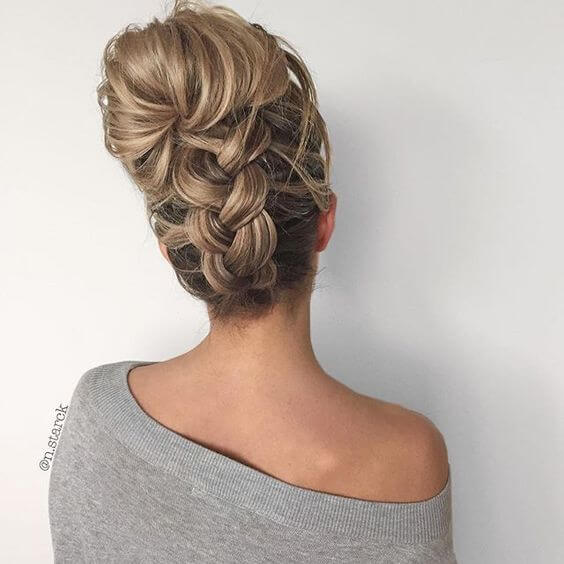
Bun it up
Now that we have a dramatic braid it is time to finish the look with an equally gorgeous bun. Bigger is always bolder so clip in your ponytail extensions and let’s get started. For a manicured look, a honey bun is the way to go. Simply use a donut or an old sock and wrap your ends around it, roll down until you have a beautifully formed bun. If you are interested in a more edgy look, why not try a messy top knot bun. This style is so easy to twist and create. If you want it extra messy simple back comb before twisting. Once you have your bun pinned in place spritz on your alcohol free hairspray and you are ready to go!


POST COMMENTS
Leave a comment