
Your Cart is empty


on today's blog:
5 Common Clip-In Hair Extensions Mistakes
reading time: 6 minutes.
+ Index (click to open)
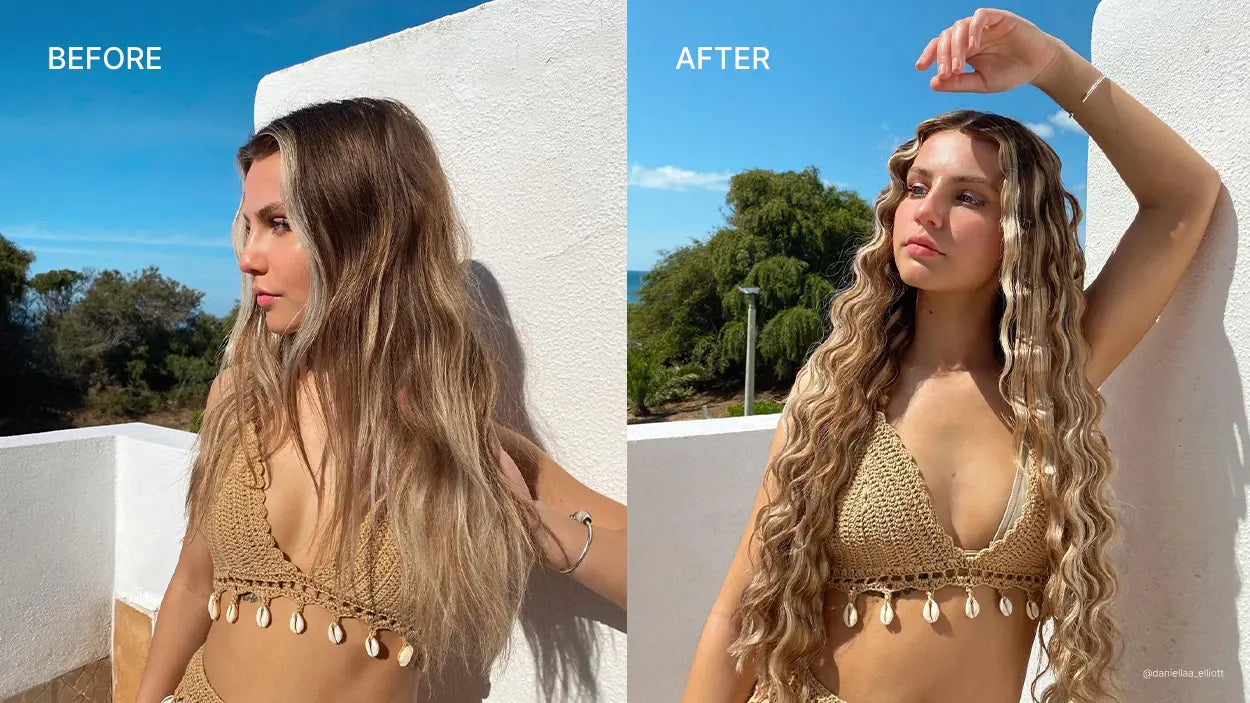
Fancy instantly transforming your short locks into booty-skimming tresses? Clip-in hair extensions are the Holy Grail for switching up your hair, rapido. But what if they slip out? Or worse – the wefts are on display? Shock, horror – everyone will know you’re A) wearing extensions and B) you’re a complete novice.
So how do some girls enviably blend their clip-in extensions in and artfully conceal their wefts? Our guide is jam-packed with clip-in hair extensions tips. Plus, it explores the 5 common clip-in hair extensions mistakes that rookies make. Such as:
- Incorrectly colour-matching clip-in hair extensions
- Not blending natural hair properly
- Using the wrong tools for clip-ins
- Not styling clip-in hair extensions correctly
- Incorrect placement of your hair extensions
Incorrectly colour-matching clip-in hair extensions
One of the biggest clip-in giveaways is when the extensions don’t match the natural colour of your hair. Sounds obvious? It can be tricky to perfectly match your natural hair to your clip-ins. Remember to match to the mid-lengths and ends of your hair for the best blend, you can also use Cliphairs FREE colour match service which is run by experts who will happily help you find your perfect colour match.
We love how @lewisodowlinghair sprays the top of his client’s hair extensions with a colour that matches her root, for a bang-on-trend, balayage style.
Don’t have any root spray? Read this blog for an in-depth guide on how to expertly colour-match your hair extensions: https://www.cliphair.co.uk/blogs/hair-blog/how-to-expertly-colour-match-hair-extensions
Not blending natural hair properly
Braiding to blend textured hair with clip-ins
Nothing screams clip-ins more than textured hair peeking out from under your glossy hair extensions. What’s a gal to do? Braid them, baby. Braiding your tresses is one of the best tips for clip-in hair extensions. Why? Because it neatly conceals them, whilst also providing a sturdy base to attach your clip-ins – cool! If you have textured, thick, curly or afro hair, securing your clip-ins into a braid ensures they stay attached to your hair for longer and won’t slip.
Need a visual? Check out how our stylist braids this beauty’s textured hair so it perfectly blends in with her sultry waves and clip-in extensions: https://www.cliphair.co.uk/pages/wish-for-cliphair-holiday-campaign-2023
Braiding to hide short hair with clip-ins
Short hair poking out from underneath your hair extensions? Another rookie clip-in mistake. But how do you blend the hair in? Just like the above tip… BRAID LIKE A BOSS. Brilliant for short to mid-length, thick hair, braiding conceals your natural hair. Now your cascading clip-ins are securely attached and merge perfectly with your natural hair. Phew!
@hannahlouisehilll skilfully demonstrates how to put in clip-in hair extensions by plaiting her hair at the nape of her head and securing it with a bobby pin. Hello, luscious, long blonde locks!
Using the wrong tools for clip-ins
Not using a hair extensions brush
All types of hair extensions need a little TLC. Clip-ins are no exception. Don’t hack away at them with a regular hairbrush! Using the wrong type of brush can damage your hair extensions by causing them to shed, tangle or damage the seam.
One of the best clip-in hair extensions tips is to invest in a special hair extension brush. Look for designs with:
- Flexible and gentle bristles that glide through the hair and don’t pull
- A cushioned base to reduce static and increase airflow to prevent dryness
- A non-slip or ergonomic handle – brushing long locks can get tiresome!
The ClipHair Wet One Brush boasts ALL the above features and safely detangles wet or dry hair with ZERO damage!
Not backcombing before applying clip-ins
So you're flaunting your lovely locks and they look 100% natural… until they start slipping out – nightmare! Clip-in mavericks know one of the best secret tips for clip-in hair extensions is to backcomb your natural hair before you attach your extensions.
This lil’ tip is a lifesaver for those with thin, fine or silky hair, which tends to have less grip. Meaning clip-ins can easily slide out – yikes. If you’re wondering how to put in clip-in hair extensions invest in a pintail comb – this professionally approved ClipHair design features a sharp, pointed tip for precise sectioning - and backcomb your tresses at the root. This insider tip creates texture for your clip-ins to stay put. Whoop!
Not styling clip-in hair extensions correctly
To style before you apply your clip-ins, or after? That is the question. We can confidently say – STYLE THEM AFTER! Why?
Styling your extensions afterwards is a brilliant clip-in extension hack for short or thick hair as it beautifully blends with your extensions. Curl, wave or even straighten your hair after your extensions have been applied to expertly merge your short tresses with your swishy locks.
@lydiakarax shares her clip-in hair extensions tips by transforming her cute bob into mermaid waves. She applies her super-long extensions first, then waves her natural hair with her extensions for a gorgeous bohemian style.
For more advice on how to expertly curl your hair extensions, read this blog: https://www.cliphair.co.uk/blogs/hair-blog/how-to-curl-hair-extensions-a-complete-guide
Applying clip-in hair extensions too high
A vital step when working out how to put in clip-in hair extensions is to avoid placing them too high. Clipping your extensions higher than your eyebrows leaves less hair to conceal the weft. And we don’t want that.
A cool hack is to place the hair extensions 1cm lower from where you part your hair. Attaching your extensions that little bit lower gives them space to naturally blend with your hair, reduces bumps and offers a touch more texture for attachment.
Can you sleep with clip-in hair extensions?
Erm… no. You may feel like a sleeping beauty with your long waves rippling out across your pillow, but believe us, in the morning you certainly won’t. All that tossing and turning will knot your extensions real bad. Plus, all those clips will pull at your natural hair causing damage.
Be a good girl and remove them before your beauty sleep. Brush them gently with a specialised hair extension brush, then pop them back into their storage box so they can get some beauty sleep too. Treating your extensions with extra special care will ensure they stay glossy, beautiful and healthy for months to come.
Conclusion
Clip-in hair extensions can gift you with instant, natural-looking flowing tresses… if you avoid the above 5 mistakes. So promise us you’ll correctly colour-match your clip-ins and braid or style your natural hair for a seamless blend. Don’t forget to backcomb if you’re a silky-haired kind of gal to avoid those clip-ins slippin’ and don’t whack ‘em in too high! Finally, prolong the longevity of your gorgeous extensions by using specially designed brushes and don’t EVER sleep in your extensions!
Think you’re ready to start clipping? Check out our vast range of gorgeous, 100% natural Remy clip-in hair extensions here. From bouncy curls and sleek locks to vibrant colours and balayage blends, we’ve got a clip-in for ALL tastes and styles.
Thank you for reading our blog! We hope you enjoyed this article – if you liked what you’ve read, share this with your friends and follow us on our Social Media channels to keep up with the latest trends, tips, guides, and more!
Interested In Hair Extensions? Shop The Best Sellers…
For our full range of Hair Extensions including Clip-Ins, Ponytails, Permanent and Many more with over 60 shades to choose from head to our main page. Including our best selling Seamless, Tape In Hair Extensions, and One Piece Hair Extensions.


Need a hand? We hear you, choosing extensions can be intimidating. Our squad of dedicated hair experts are here to help with everything from free colour matching to a full consultation. No query is too big or too small, pop a message over to our WhatsApp team today. Chat via messenger or request a call back, we’re ready when you are!

Longing for more hair advice and inspiration? Follow our Socials for the latest trends, tips and tutorials or subscribe to our newsletter to receive exclusive offers and insider hair tips straight to your inbox.
Stay Fabulous!
